New sections to docs #790
There are no files selected for viewing
This file contains hidden or bidirectional Unicode text that may be interpreted or compiled differently than what appears below. To review, open the file in an editor that reveals hidden Unicode characters.
Learn more about bidirectional Unicode characters
This file contains hidden or bidirectional Unicode text that may be interpreted or compiled differently than what appears below. To review, open the file in an editor that reveals hidden Unicode characters.
Learn more about bidirectional Unicode characters
This file contains hidden or bidirectional Unicode text that may be interpreted or compiled differently than what appears below. To review, open the file in an editor that reveals hidden Unicode characters.
Learn more about bidirectional Unicode characters
This file contains hidden or bidirectional Unicode text that may be interpreted or compiled differently than what appears below. To review, open the file in an editor that reveals hidden Unicode characters.
Learn more about bidirectional Unicode characters
| Original file line number | Diff line number | Diff line change | ||||||
|---|---|---|---|---|---|---|---|---|
| @@ -0,0 +1,67 @@ | ||||||||
| --- | ||||||||
| id: api-testing-add-suite | ||||||||
| title: Adding New Test Suites | ||||||||
| description: Guide to adding to new Suites using "Add New" | ||||||||
| sidebar_label: Adding New Suite | ||||||||
| tags: | ||||||||
| - api-testing | ||||||||
| - test-organization | ||||||||
| - test-suite | ||||||||
| - test-management | ||||||||
| --- | ||||||||
| import ProductTier from '@site/src/components/ProductTier'; | ||||||||
|
|
||||||||
| <ProductTier tiers="Free, Teams, Scale, Enterprise" offerings="Self-Hosted, Dedicated" /> | ||||||||
|
|
||||||||
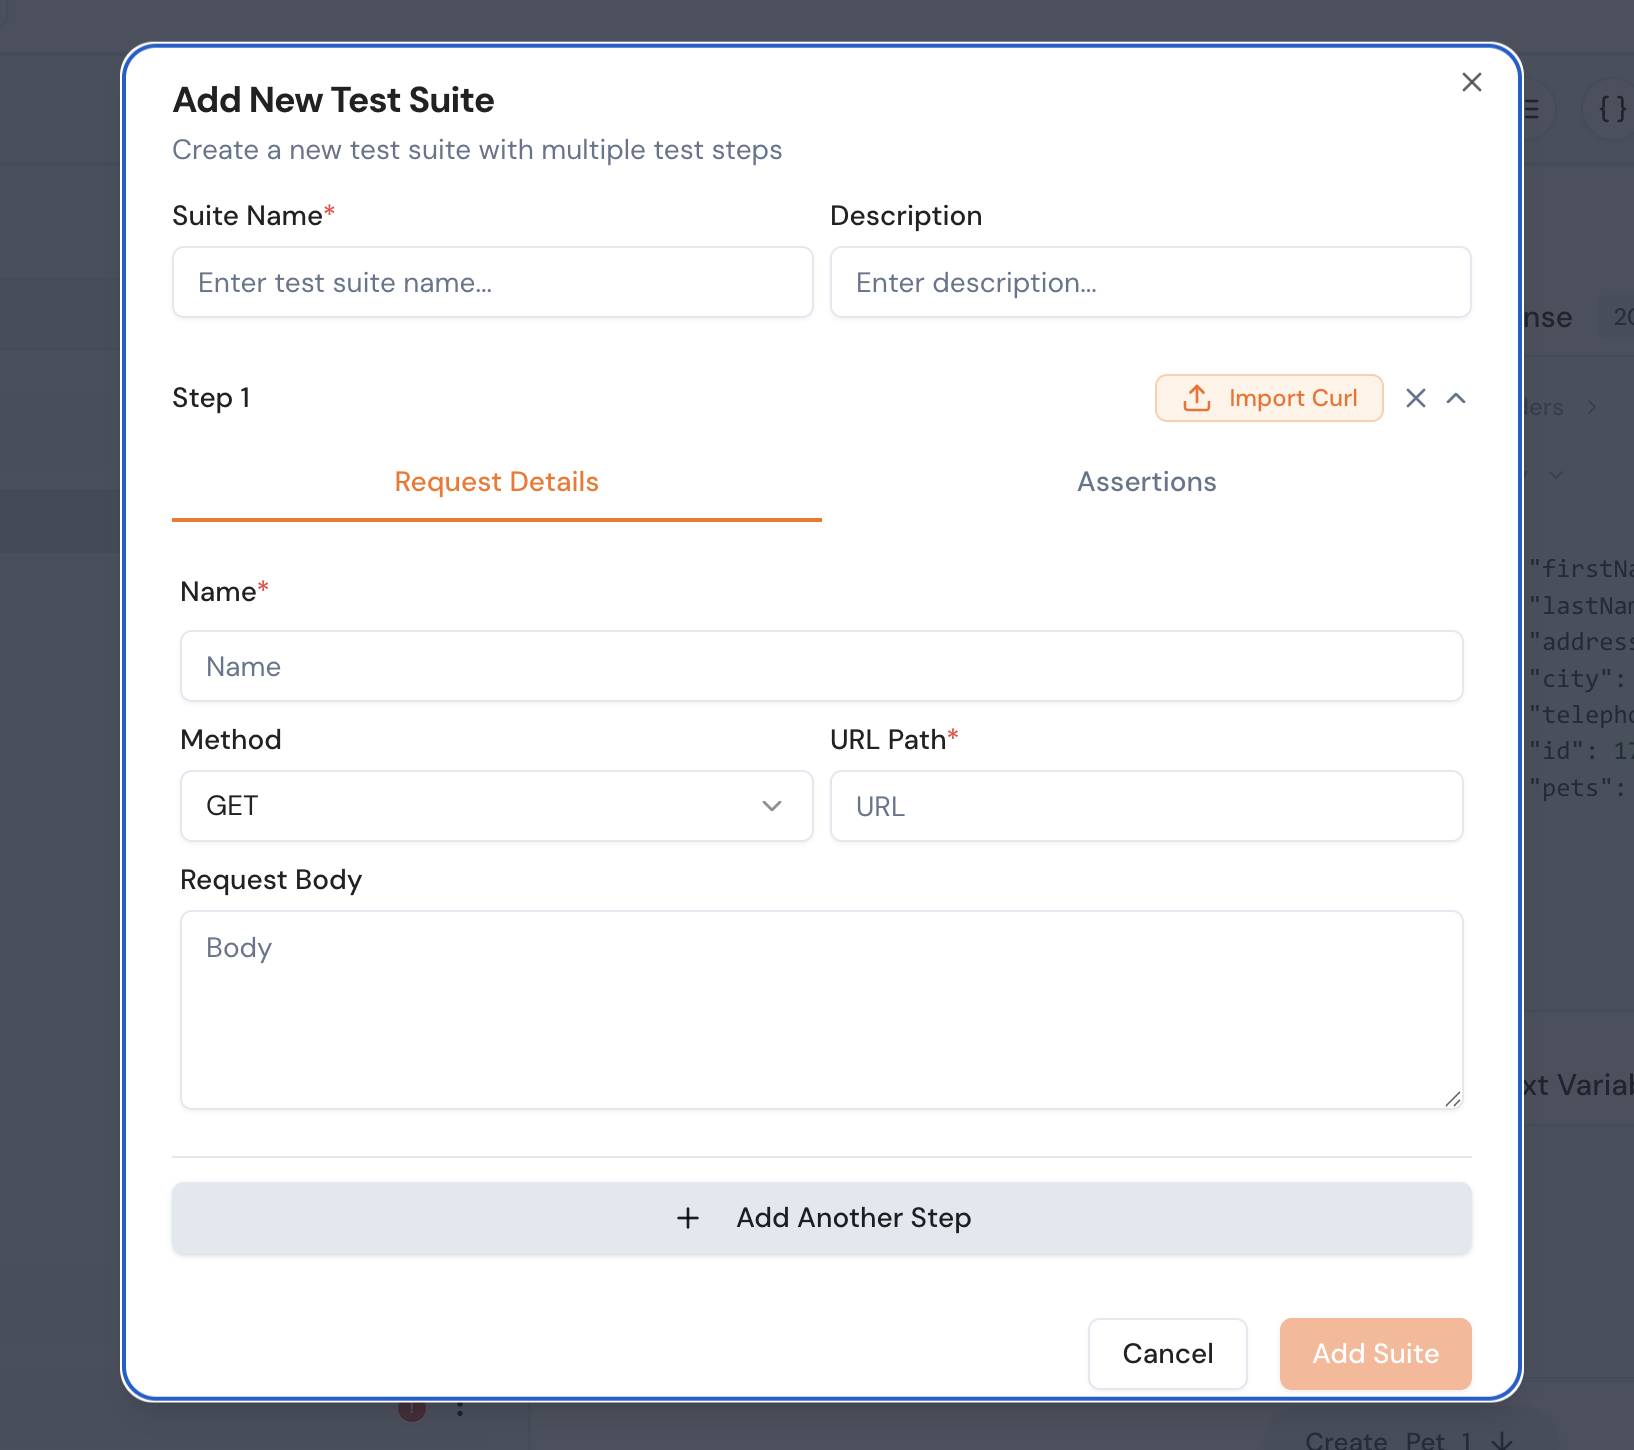
| In this guide, we will walk through the process of adding a test suite in Keploy. Users can either manually provide the details for the test suite or directly import a curl command to create one. | ||||||||
|
|
||||||||
| ## Steps to Add a Test Suite | ||||||||
|
|
||||||||
| 1. **Click on the Plus Button** | ||||||||
| - Navigate to the test suite section in the Keploy interface. | ||||||||
| - Click on the `+` button to add a new test suite. | ||||||||
|
|
||||||||
| 2. **Provide Test Suite Details** | ||||||||
| - Fill in the following fields: | ||||||||
| - **Name**: Enter a unique name for the test suite. | ||||||||
| - **Details**: Provide a brief description of the test suite. | ||||||||
| - **Request**: Specify the request details, such as the HTTP method, URL, headers, and body. | ||||||||
| - **Assertions**: Define any Assertions related to the test suite. | ||||||||
|  | ||||||||
|
|
||||||||
| 3. **Import a Curl Command (Optional)** | ||||||||
| - If you have a curl command, you can directly import it to create the test suite. | ||||||||
| - Paste the curl command in the provided input field. | ||||||||
| - Keploy will automatically parse the curl command and populate the test suite details. | ||||||||
|
|
||||||||
| 4. **Save the Test Suite** | ||||||||
| - Once all the details are filled in, click on the `Save` button to create the test suite. | ||||||||
|
|
||||||||
| ## Example | ||||||||
|
|
||||||||
| ### Manual Entry | ||||||||
| ```json | ||||||||
| { | ||||||||
| "name": "User Authentication", | ||||||||
| "details": "Tests the login functionality.", | ||||||||
| "request": { | ||||||||
| "method": "POST", | ||||||||
| "url": "https://api.example.com/login", | ||||||||
| "headers": { | ||||||||
| "Content-Type": "application/json" | ||||||||
| }, | ||||||||
| "body": { | ||||||||
| "username": "test_user", | ||||||||
| "password": "secure_password" | ||||||||
| } | ||||||||
| }} | ||||||||
|
There was a problem hiding this comment. WARNING: Malformed JSON - extra closing brace
Suggested change
|
||||||||
| ``` | ||||||||
|
|
||||||||
| ### Importing a Curl Command | ||||||||
| ```bash | ||||||||
| curl -X POST https://api.example.com/login \ | ||||||||
| -H "Content-Type: application/json" \ | ||||||||
| -d '{"username": "test_user", "password": "secure_password"}' | ||||||||
| ``` | ||||||||
|
|
||||||||
| By following these steps, you can easily create and manage test suites in Keploy. | ||||||||
This file contains hidden or bidirectional Unicode text that may be interpreted or compiled differently than what appears below. To review, open the file in an editor that reveals hidden Unicode characters.
Learn more about bidirectional Unicode characters
| Original file line number | Diff line number | Diff line change |
|---|---|---|
| @@ -0,0 +1,134 @@ | ||
| --- | ||
| id: api-testing-adding-labels | ||
| title: Adding Labels to Test Suites | ||
| description: Guide to creating and assigning labels to test suites individually or in bulk | ||
| sidebar_label: Adding Labels | ||
| tags: | ||
| - api-testing | ||
| - test-organization | ||
| - labels | ||
| - test-management | ||
| --- | ||
|
|
||
| import ProductTier from '@site/src/components/ProductTier'; | ||
|
|
||
| <ProductTier tiers="Free, Teams, Scale, Enterprise" offerings="Self-Hosted, Dedicated" /> | ||
|
|
||
| Labels help you organize, categorize, and filter your test suites effectively. Keploy provides flexible labeling options that allow you to add labels to individual test suites or multiple suites at once. | ||
|
|
||
| ## Overview | ||
|
|
||
| The labeling system includes: | ||
|
|
||
| - **Individual Labeling**: Add labels to specific test suites | ||
| - **Bulk Labeling**: Apply labels to multiple suites simultaneously | ||
| - **Label Management**: Create, edit, and delete custom labels | ||
| - **Filtering**: Use labels to filter and organize your test collection | ||
|
|
||
| ## Adding Labels to Individual Test Suites | ||
|
|
||
| ### Method 1: Using the Three Dots Menu | ||
|
|
||
| 1. **Navigate to Test Suites** | ||
| - Go to your Test Suites Dashboard | ||
|
|
||
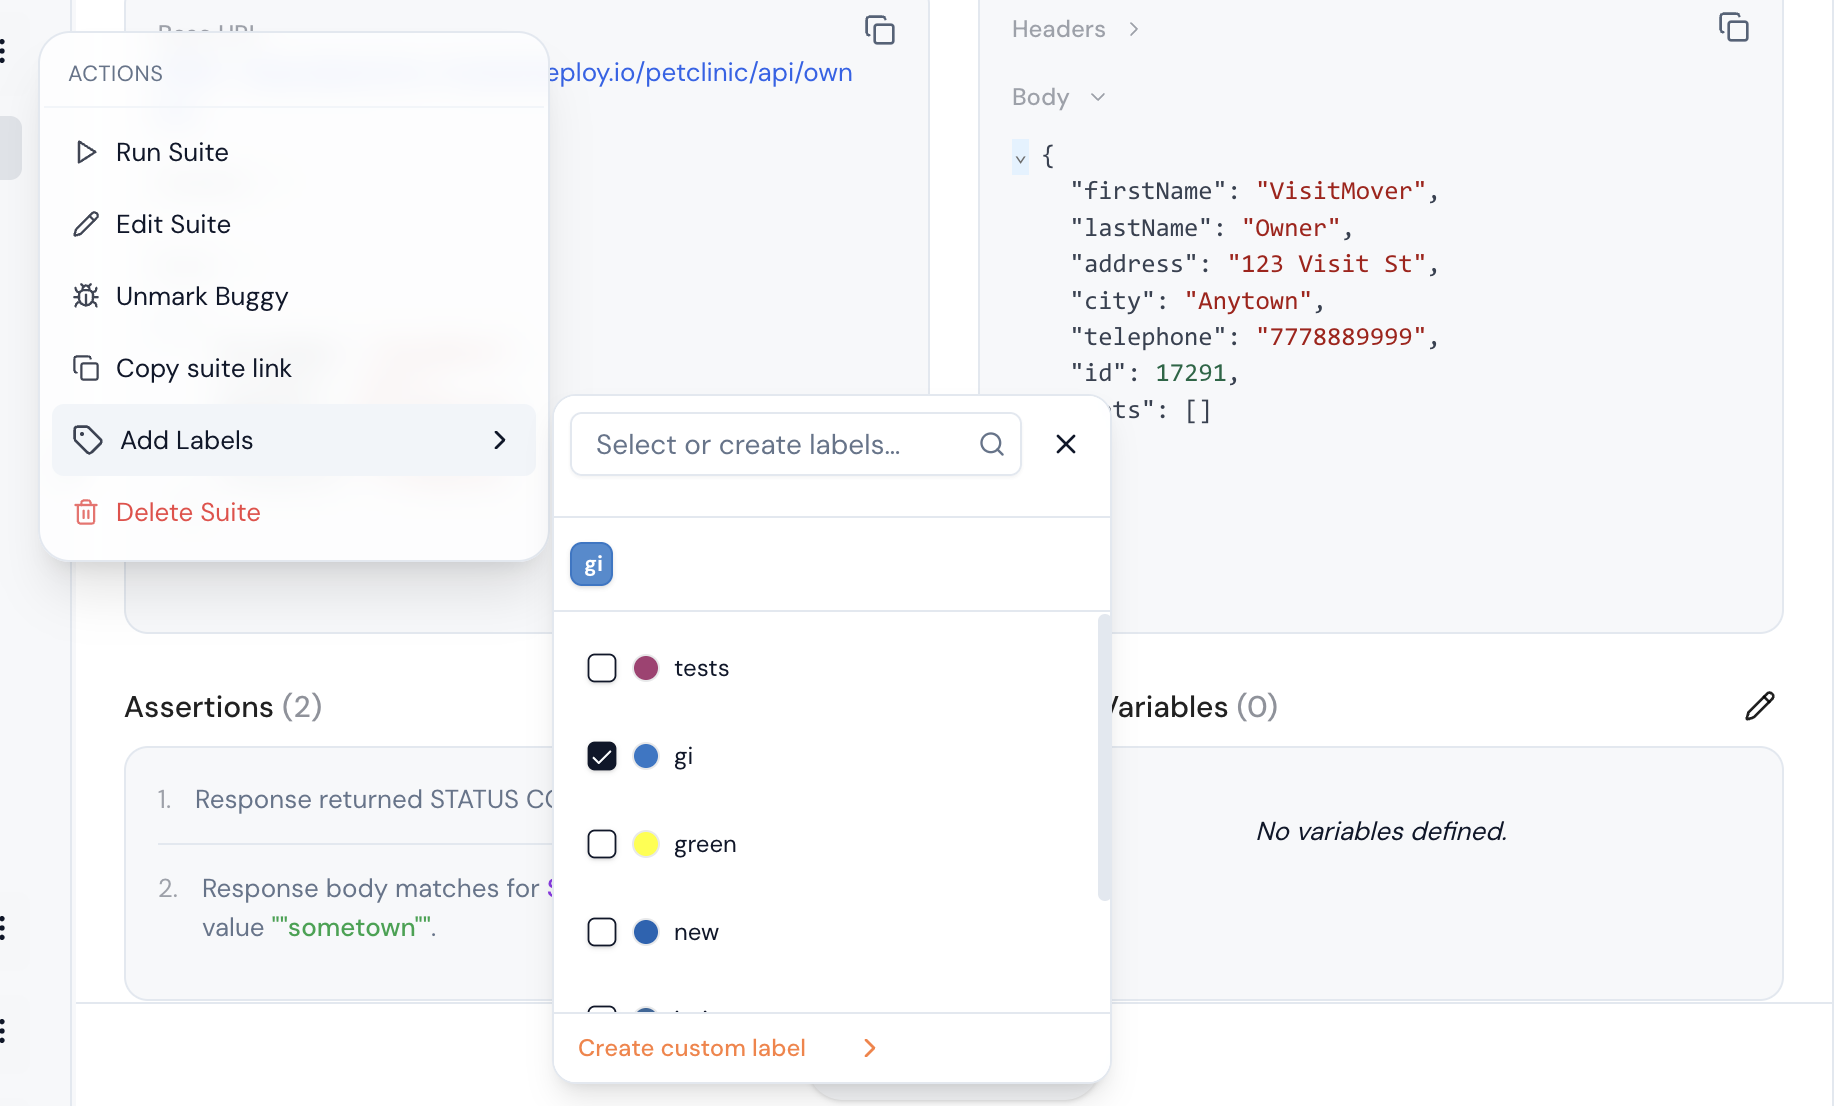
| 2. **Access Suite Options** | ||
| - Locate the test suite you want to label | ||
| - Click the **three dots (⋮)** menu next to the test suite name | ||
|
|
||
| 3. **Select Add Label Option** | ||
| - From the dropdown menu, click **"Add Labels"** | ||
|
|
||
|  | ||
|
|
||
| ## Label Assignment Interface | ||
|
|
||
| When you open the label assignment dialog, you'll see: | ||
|
|
||
| ### Existing Labels Section | ||
| ``` | ||
| 🏷️ Available Labels | ||
| ├── 📊 Priority | ||
| │ ├── high-priority (P0) | ||
| │ ├── medium-priority(P1) | ||
| │ └── low-priority(P2) | ||
| ``` | ||
|
|
||
| ### Assigning Existing Labels | ||
|
|
||
| 1. **Browse Categories** | ||
| - Expand label categories to see available options | ||
| - Use the search box to find specific labels quickly | ||
|
|
||
| 2. **Select Labels** | ||
| - Click on labels to select them | ||
| - Selected labels will be highlighted or marked with a checkmark ✓ | ||
| - You can select multiple labels from different categories | ||
|
|
||
| 3. **Apply Labels** | ||
| - Review your selections in the "Selected Labels" preview | ||
| - Click **"Apply Labels"** to assign them to the test suite | ||
|
|
||
| ## Creating New Labels | ||
|
|
||
| ### Creating During Assignment | ||
|
|
||
| 1. **Open Label Dialog** | ||
| - Follow the steps above to open the label assignment interface | ||
|
|
||
| 2. **Create New Label** | ||
| - Click **"Create Custom Label"** | ||
| - Enter label details in the creation form | ||
|
|
||
| 3. **Label Creation Form** | ||
| - For Example: | ||
| ``` | ||
| Label Name: [smoke-critical] | ||
| Color: [🔴] (color picker) | ||
| ``` | ||
|
|
||
| ## Bulk Label Assignment | ||
|
|
||
| ### Using Checkbox Selection | ||
|
|
||
| 1. **Select Multiple Suites** | ||
| - Navigate to the Test Suites list | ||
| - Use checkboxes to select multiple test suites | ||
| - After selecting suites, Click **"Add Labels"** or **"Create Custom Labels"** button | ||
|
|
||
| ## Label Management Best Practices | ||
|
|
||
| ### Naming Conventions | ||
|
|
||
| 1. **Use Consistent Formatting** | ||
| ``` | ||
| ✅ Good Examples: | ||
| - team-frontend | ||
| - priority-high | ||
| - env-production | ||
| - type-smoke-test | ||
|
|
||
| ❌ Avoid: | ||
| - TeamFrontend | ||
| - HIGH_PRIORITY | ||
| - prod env | ||
| - smoke test type | ||
| ``` | ||
|
|
||
| 2. **Category-Based Organization** | ||
| ``` | ||
| Priority: critical, high, medium, low | ||
| Environment: production, staging, development | ||
| Type: smoke, regression, integration, e2e | ||
| Team: frontend, backend, qa, devops | ||
| Status: active, deprecated, experimental | ||
| ``` | ||
|
|
||
| ## Related Features | ||
|
|
||
| - **[Test Suite Management](./api-testing-edit-suites.md)**: Edit and organize test suites | ||
| - **[Selective Test Execution](./api-testing-running-selective.md)**: Run tests using label filters | ||
| - **[Test Reports](./api-testing-sharing-reports.md)**: Generate reports filtered by labels | ||
| - **[Custom Assertions](./api-testing-custom-assertions.md)**: Create assertions for labeled suites | ||
|
|
||
| Labels are a powerful organizational tool that help you maintain order in large test collections and enable efficient test management workflows. |
This file contains hidden or bidirectional Unicode text that may be interpreted or compiled differently than what appears below. To review, open the file in an editor that reveals hidden Unicode characters.
Learn more about bidirectional Unicode characters
| Original file line number | Diff line number | Diff line change |
|---|---|---|
| @@ -0,0 +1,115 @@ | ||
| --- | ||
| id: api-testing-assertion-tree | ||
| title: Assertion Tree | ||
| sidebar_label: Assertion Tree | ||
| description: Visualize and manage your entire test flow in a structured tree format | ||
| tags: | ||
| - API testing | ||
| - test visualization | ||
| - assertion tree | ||
| - test flow | ||
| - automation | ||
| keywords: | ||
| - test suite visualization | ||
| - assertion tree | ||
| - API flow | ||
| - test step editor | ||
| - visual test builder | ||
| --- | ||
|
|
||
| import ProductTier from '@site/src/components/ProductTier'; | ||
|
|
||
| <ProductTier tiers="Free, Teams, Scale, Enterprise" offerings="Self-Hosted, Dedicated" /> | ||
|
|
||
| ## Assertion Tree | ||
|
|
||
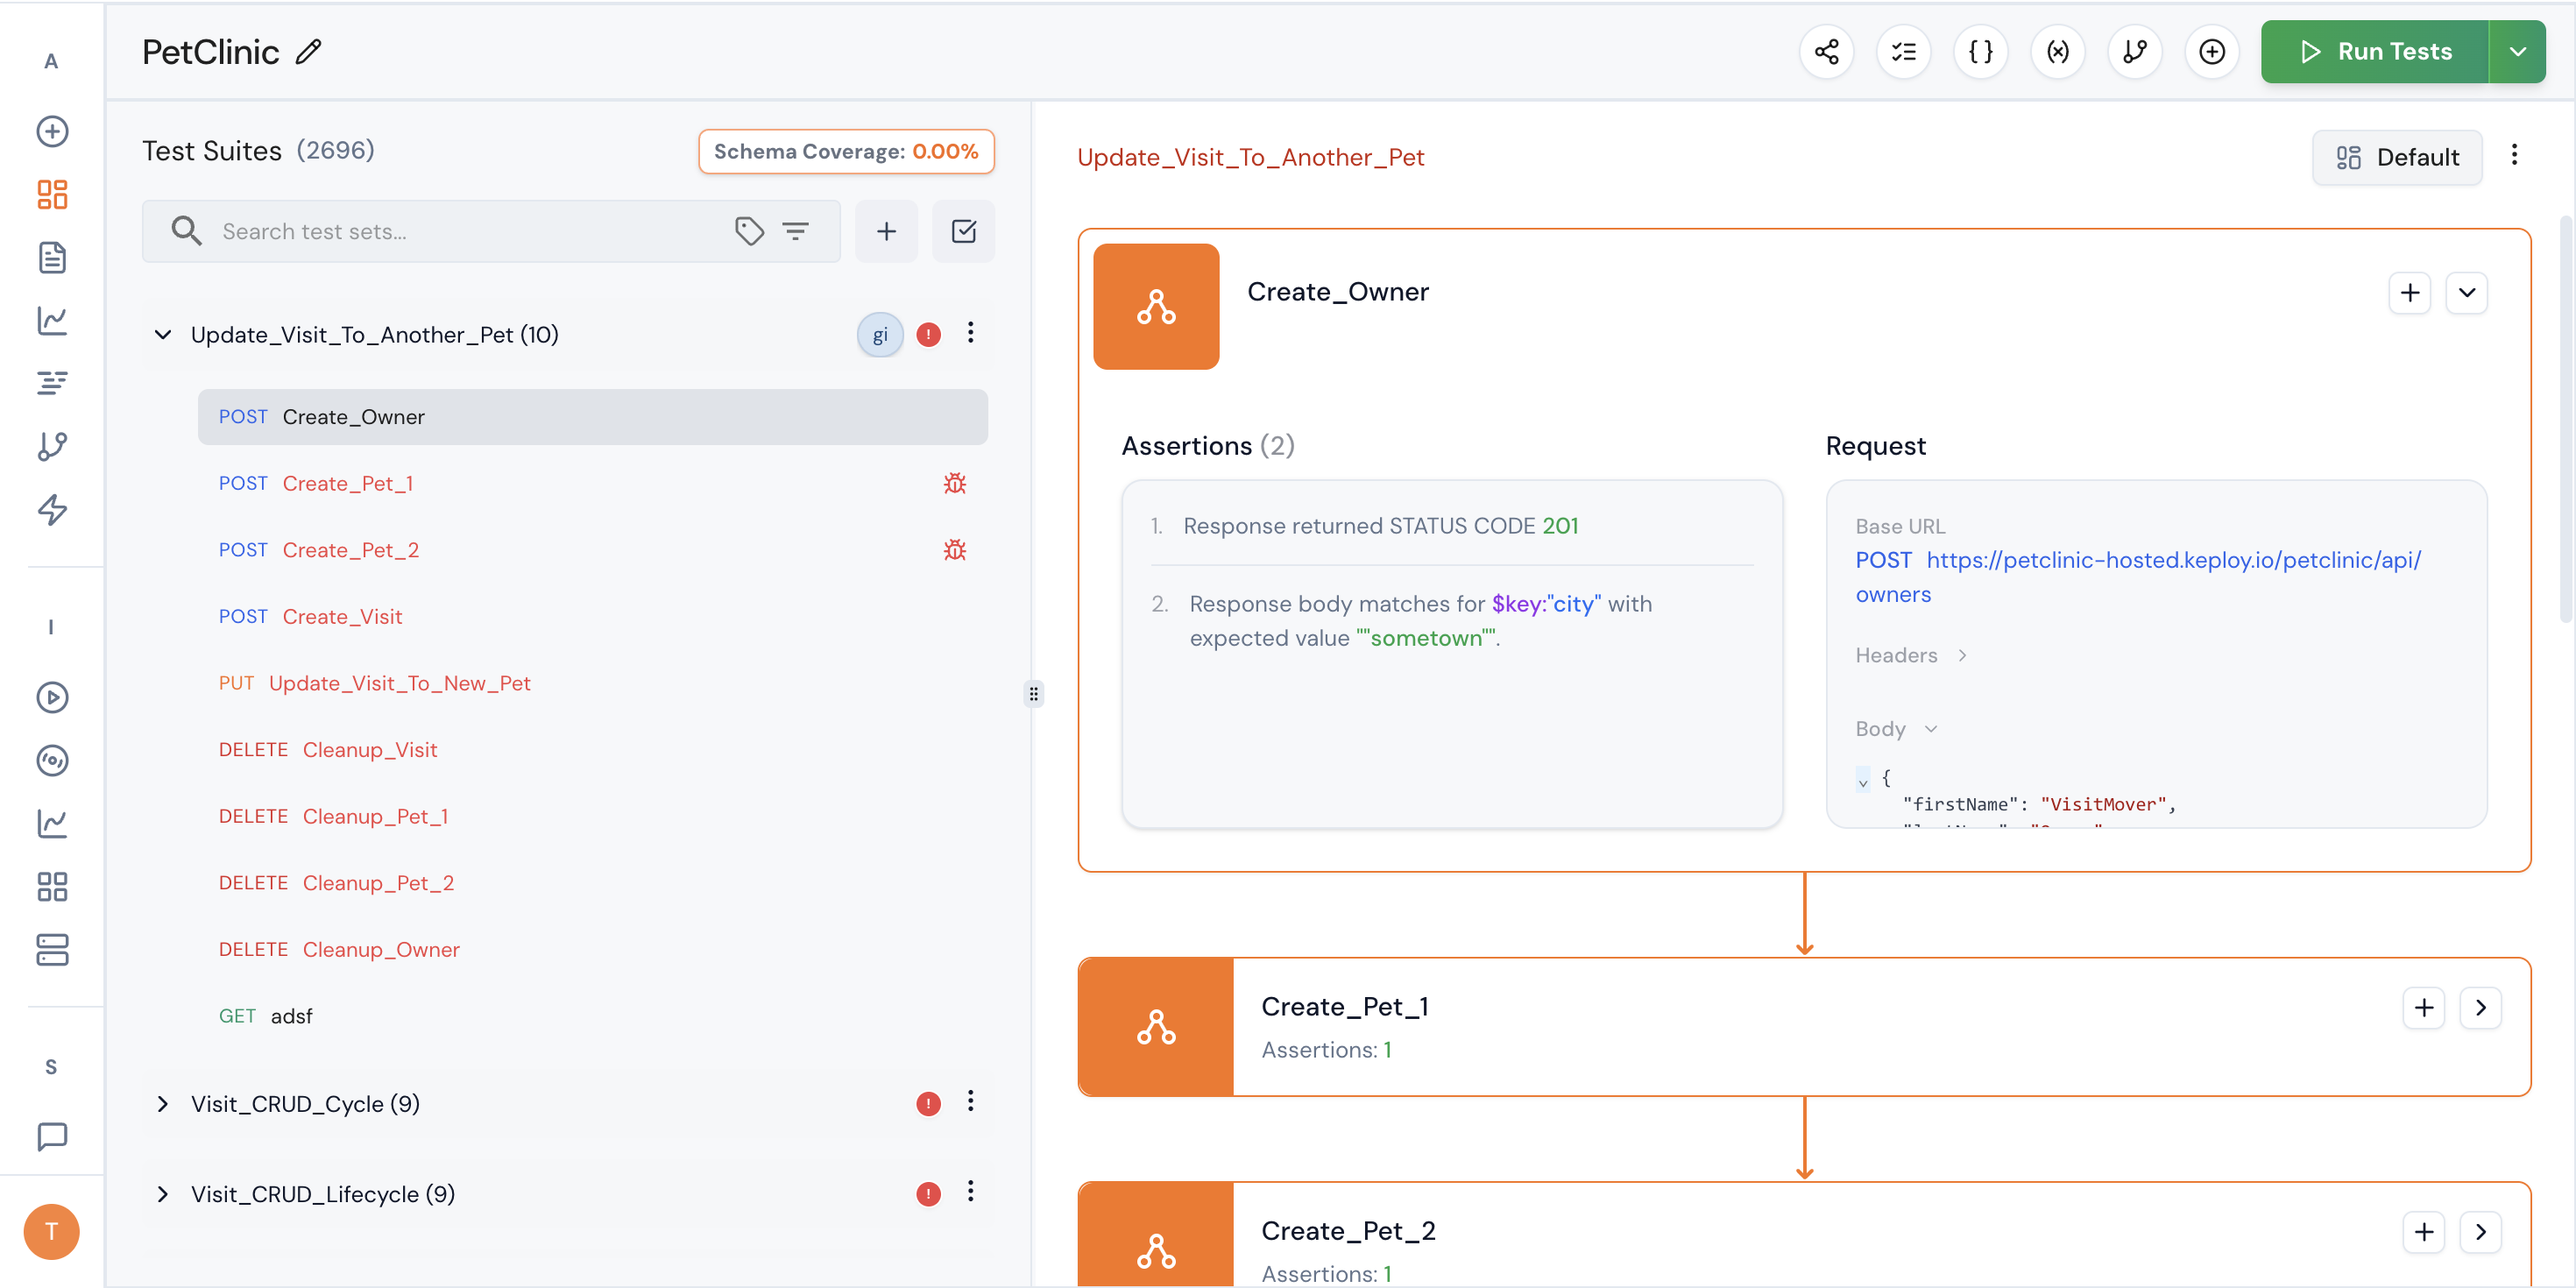
| The **Assertion Tree** allows you to visualize and manage your entire test suite in a structured, hierarchical format. | ||
|
|
||
| Instead of viewing tests as isolated steps, the Assertion Tree gives you a complete flow-level perspective — including requests, responses, and assertions — in one interactive interface. | ||
|
|
||
| --- | ||
|
|
||
| ## How to Access the Assertion Tree | ||
|
|
||
| 1. Navigate to an individual **Test Suite** | ||
| 2. Click on the **"Visualize"** button | ||
| 3. The system renders the full test suite in a **tree format** | ||
|
|
||
| --- | ||
|  | ||
|
|
||
| ## What You Can See | ||
|
|
||
| The Assertion Tree provides a visual representation of: | ||
|
|
||
| - All test steps in execution order | ||
| - Request details for each step | ||
| - Attached assertions | ||
|
|
||
| Each node in the tree represents a test step and contains: | ||
|
|
||
| - Request configuration | ||
| - Associated assertions | ||
| - Execution dependencies | ||
|
|
||
| This makes it easier to understand how your test suite behaves as a complete workflow. | ||
|
|
||
| ## What You Can Do | ||
|
|
||
| The Assertion Tree is fully interactive. You can: | ||
|
|
||
| ### 1. View Complete Flow | ||
| Understand the entire API workflow from start to finish without switching between screens. | ||
|
|
||
| ### 2. Inspect Assertions Inline | ||
| Quickly see which assertions are attached to each step, including: | ||
|
|
||
| - Status code validations | ||
| - JSON validations | ||
| - Header validations | ||
| - Schema validations | ||
| - Custom function validations | ||
|
|
||
| ### 3. Add a New Step in the Flow | ||
|
|
||
| You can insert a new test step directly within the tree. | ||
|
|
||
| This allows you to: | ||
|
|
||
| - Expand an existing workflow | ||
| - Add conditional validation steps | ||
| - Introduce additional API calls | ||
| - Build multi-step integration flows | ||
|
|
||
| The new step becomes part of the structured execution sequence. | ||
|
|
||
| ## Why Use the Assertion Tree? | ||
|
|
||
| The Assertion Tree is particularly useful when: | ||
|
|
||
| - Your test suite contains multiple API calls | ||
| - You are testing end-to-end workflows | ||
| - Business logic spans multiple requests | ||
| - You need clarity on how validations are structured | ||
| - You want a visual representation instead of linear editing | ||
|
|
||
| It transforms test management from a flat list into a structured execution graph. | ||
|
|
||
| ## Typical Use Cases | ||
|
|
||
| - Authentication → Resource Creation → Validation → Cleanup flows | ||
| - Multi-step payment processing validations | ||
| - E-commerce checkout journeys | ||
| - Webhook-triggered event testing | ||
| - Integration testing across services | ||
|
|
||
| ## Best Practices | ||
|
|
||
| - Use the tree view to design full workflows before adding assertions | ||
| - Keep each step focused on a single responsibility | ||
| - Attach assertions at the correct step level | ||
| - Review flow dependencies to avoid unintended execution order | ||
| - Use visualization to debug failing multi-step tests faster | ||
|
|
||
|
|
||
| The Assertion Tree enables you to design, inspect, and extend complex API workflows with clarity and precision — all from a single visual interface. |
Oops, something went wrong.
Oops, something went wrong.
Add this suggestion to a batch that can be applied as a single commit.
This suggestion is invalid because no changes were made to the code.
Suggestions cannot be applied while the pull request is closed.
Suggestions cannot be applied while viewing a subset of changes.
Only one suggestion per line can be applied in a batch.
Add this suggestion to a batch that can be applied as a single commit.
Applying suggestions on deleted lines is not supported.
You must change the existing code in this line in order to create a valid suggestion.
Outdated suggestions cannot be applied.
This suggestion has been applied or marked resolved.
Suggestions cannot be applied from pending reviews.
Suggestions cannot be applied on multi-line comments.
Suggestions cannot be applied while the pull request is queued to merge.
Suggestion cannot be applied right now. Please check back later.
Uh oh!
There was an error while loading. Please reload this page.